Best Warm Ups and Stretches to Prevent Yoga Injuries

Are you a yoga fanatic? If so, then the last thing that you want is to be sidelined by an injury. Yoga can be great for your body and mind, but it’s important to take care of yourself too. This blog post will walk you through some stretches and exercises so that you can avoid common yoga injuries.
The Most Common Yoga Injuries
The most common yoga injuries are the result of overworking certain muscles in your body. This can make you more susceptible to specific problems like rotator cuff injuries, carpal tunnel syndrome, plantar fasciitis and even frozen shoulders.
These all happen because people are not doing enough stretching before or after their workout sessions. You should never try to push your limits. Doing so can result in injuries, which will not only take you out of yoga practice for a while but could also cause other problems down the line.
Essential Equipment for Doing Yoga
Having the right equipment can make a big difference in your routine. If you’re not able to do stretches effectively, then there is simply no point in continuing with yoga. Here are a few of the essential pieces of equipment that you’ll need to do yoga:
- Yoga Mat: A thick and comfortable yoga mat is a must-have. If it isn’t thick enough, then your arms will probably slip as you try to hold downward dog position or other similar poses. Your hands and feet will also slip during some poses, which could result in a fall.
- Yoga Strap: Yoga straps are great for doing stretches that require more flexibility than the average person possesses. If your hamstrings or hips feel tight when you’re trying to do a simple forward fold, then you can use the strap as leverage. Yoga straps are also useful for lengthening your spine and opening up opportunities for deeper stretches.
- Yoga Blocks: A yoga block is another great piece of equipment if you’ve ever had tight hips or hamstrings that make it difficult to do a pose. Using the block elevates your feet and allows you to extend further, stretching out those muscles in ways that they haven’t been stretched before.
- Clothes: You can’t go to yoga in your everyday street clothes. Instead, you should wear something that is stretchy and easy to move around in like leggings or shorts paired with a tank top.
- Socks: It’s best to go barefoot for yoga, but you can also use socks that are made for yoga. So forego the performance socks you normally use for exercising and use a pair with grips on the bottoms that will keep you from sliding all over your mat.

The Importance of Warming Up and Stretching
It’s always best to warm up before starting your yoga session. This will help prep your body for the workout ahead, which makes it more likely that you won’t injure yourself while practicing.
Stretching is an equally integral part of any yoga practice because it helps reduce muscle tension and can prevent pain later on down the line. The best way that you can prevent these issues is by taking some time before and after each session to properly stretch out your muscles.
Below are some simple stretching exercises that help keep your body in good shape as you practice.

Stretches for your Wrists
Wrist exercises may seem like a small thing to do, but they have a massive impact on your yoga practice. If you don’t spend some time working out the tension in your wrists before class starts, then it will be much more likely that you’ll suffer from tendonitis or carpal tunnel syndrome at some point down the line. If you do, be sure to wrap your tendonitis properly.
Praying Position (Anjali Mudra)
The praying position is a common yoga pose that really loosens the wrist. This version brings the arms together and deepens the pose.
Steps: Part 1
- Start by standing and then place your palms together as if you are praying. While keeping your hands in front of your face, bring the inside of your elbows and arms close until they touch each other.
- Keeping your palms together, gradually spread your arms apart. While doing this, lower your praying hands to waist height. You want to maintain that pose until your praying hands reach the front of your belly button or you begin to feel the stretch.
- Maintain the stretch for 10-30 seconds and then repeat.

Steps: Part 2
- At shoulder height, extend your left arm in front of you.
- Position the hand so that the palm faces the floor.
- Relax your wrist so that your fingers hang downward.
- Use your right hand to gently grasp your fingers.
- Pull the fingers back toward your body and hold them for 10-30 seconds.
- Repeat on the right arm.
Extended Arm
Extended Arm lets you stretch in the opposite direction.
Steps:
- Extend your right arm while keeping your palms facing upward.
- Take your left hand and press your fingers downward toward the floor.
- Gently pull your right fingers back toward your body.
- Hold the pose for 10-30 seconds.
- Cycle through 2-3 times with each arm.
Stretches for Your Shoulders
The stretches below will help release tension from your shoulders and let you get deeper into poses.
Half Dog
The Half Dog stretches your shoulders and opens up the chest muscles.
Steps:
- Begin by standing and facing a wall. You want to be about a leg’s length distance from it.
- Put your hands on the wall somewhere between shoulder and elbow height (elbow height will take more flexibility).
- Bend over and place your palms and finger pads against the wall.
- Dynamically elongate the line from the top of the head to the wall and the hips directly behind you, guiding them in opposite directions so you could create space in each vertebra.
- Stay here for five full deep breaths.
- Slowly come up when you’re ready.

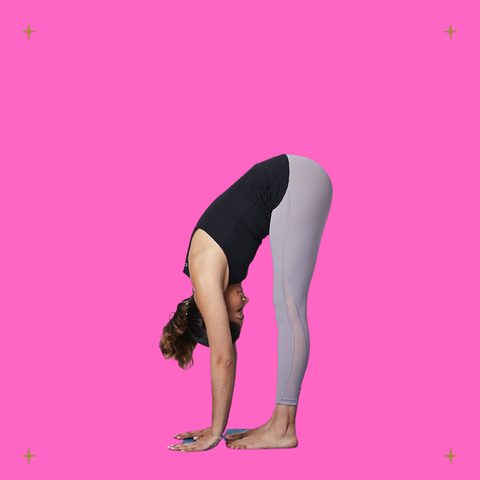
Forward Fold (Uttanasana)
The Forward Fold is an excellent stretch for releasing tension in the back, shoulders and neck. You'll feel a deep stretch across all of these areas once you get into this pose.
Steps:
- Start from the Raised Hands Pose, which will have your arms reaching overhead. Your feet can be touching or about hip distance apart, whichever feels the most comfortable.
- Next, use a sweeping motion to lower both arms down to the side of your torso and down into a forward fold from the hips.
- Breathe out and lower your body until you feel the tops of your toes with your fingers. Try to press your palms flat against the yoga mat if you can. If your hands don’t reach the floor, you can use yoga blocks.
- Slightly bend the knees so that they aren’t locked. If this position is uncomfortable, you can modify it by bending your legs a little more.
- Use your quadriceps muscles by drawing them up. The more you utilize your quadriceps, the more your hamstrings will open up.
- Bring your weight forward onto the balls of your feet a little. You’ll want your hips to stay stable over your ankles.
- Allow your head to hang down.
- Next, come back up. To do it: 1) Inhale, 2) place your hands on your hips, 3) move your tailbone down and 4) suck in your abdominal muscles as you rise up.
Stretches for Your Feet and Legs
Since your feet are what support you when you do yoga, it makes sense to stretch them out before doing a pose. The following stretches will help increase flexibility in your feet and legs:
Raised Hands Pose (Urdhva Hastasana)
This pose, which feels a lot like the full-body stretch you do when you get out of bed each morning, strengthens the legs and improves posture.
Steps:
- Starting from Standing Mountain Pose, inhale; bring arms out to the sides in a parallel fashion.
- Bring your palms together overhead facing each other. While doing this, your arms should be straight and your hands active through the fingertips. Focus your gaze upward to your thumbs.
- Next, slide both shoulders away from your ears while concentrating on broadening this motion through your collar bones. If you feel as if your ribs are pulling apart or jutting forward slightly, bring them back together. Be sure to keep your thigh muscles engaged so they draw your kneecaps up.
- While keeping your arms overhead, press into your feet as you lift through the top of your head. Then, pull the navel gently towards your spine while maintaining a lift throughout the sternum.
- Lastly, lower your arms and release the pose.

Standing Mountain Pose (Tadasana)
The Standing Mountain Pose targets your whole body, including your legs. Plus, it helps with posture.
Steps:
- Stand with your feet parallel and a few inches apart.
- Lift and spread the balls of your feet and toes and then plant them gently back on the floor.
- Next, gently rock back and forth & side to side. Gradually reduce swaying until you come to a standstill, while simultaneously balancing your weight evenly across your feet.
- Lift the top of your sternum toward the ceiling, ensuring that you aren’t pushing your lower front ribs forward when you do it. Feel your collarbones widen. Next, allow your shoulder blades to come in toward one another & down the back, away from your ears.
- Let your arms relax alongside your torso, with palms facing forward.
- Balance the top of your head directly over your pelvis’s center, keeping the bottom of your chin parallel to the floor. While doing this keep your throat soft and your tongue broad and flat on your mouth’s floor. Shut your eyes and breathe deeply.
Downward Dog (Adho Mukha Svanasana)
Downward Dog can help relieve the aches and pains caused by tight hamstrings. The steps below are courtesy of the instructors and staff at MasterClass.
https://www.masterclass.com/articles/downward-dog-explained#5-tips-for-performing-downward-dog
Steps:
- Start by getting down on all fours with your hands shoulder-width apart and shoulders above your wrists. Align your inner shoulders to your index fingers. Your hips should be above your knees or slightly before them.
- Next, you’re going to lift your knees. Start by tucking your toes against the yoga mat and use that leverage to extend your legs and lift both knees into the air. Your body should now look like an upside-down “V.”
- Extend and lengthen your spine by pressing through the balls of your feet and palms. Pull your pelvis upward and stabilize your form by using the triceps in your upper arms. To do this you can either draw your shoulder blades down your back or by rotating the joints to support your torso.
- Lastly, hold your body in position, ensuring that you are breathing properly. Then, slowly bring the knees back in place to the floor.

Tree Pose (Vrksasana)
The Tree Pose helps build balance while also strengthening legs and feet at the same time.
- From Standing Mountain Pose, bend your right knee and place your right foot high on your left inner thigh, keeping your hands on your hips.
- Allow your right knee to be as much forward as will allow the front of the hipbones to stay square. You do not want any rotation in your pelvis at this time.
- Ensure your standing foot continues to point forward. Then, press your right foot to your left inner thigh.
- You should see that your right hip is hiked up somewhat higher than the left, shortening your right waist; squatting your right sitting bone towards your left heel.
- Note how the body compensates when you do Step 4. Your left thigh bows forward and your left outer hip sticks out a little too. To correct this compensation, press your left thigh bone back and straighten the left outer hip firmly into the midline.
- Keeping the pelvis square to the wall in front of you, carefully pull your right knee back and deepen the external rotation in your hip region. Important: Only draw your knee back as far as it allows your hips to stay square.
- Raise your arms without causing your front ribs to flare out.
- If you are able to keep your arms straight and your body balanced, reach up, touch your palms and focus your gaze on your thumbs.
- Hold for 5-10 breaths.
- To exit, exhale and return to the Standing Mountain Pose.

Stretches for Your Hips and Thighs
The muscles in your hips and thighs are responsible for moving the legs side to side, up and down, and rotating them inward or outward. Here's how you can stretch these all-important muscles:
Pigeon Pose (Kapotasana)
The pigeon pose is known as the king of hip openers, and it stretches out the hamstrings too. There are various ways of approaching Pigeon Pose, and one of the simplest is from Downward Dog. Additionally, you can follow the same steps and start from your hands and knees if you want.
- From Downward Dog, bring your right leg up and into the Down Dog Split (Very Well Fit has a nice tutorial for the Down Dog Split here).
- Bend the knee on the right and bring this leg forward as if stepping into a lunge. However, instead of placing your foot down like you would for an actual lunge, bring this knee downward until you reach the floor outside of your right hand, towards the wrist. You should wind up with your right shin being parallel to the yoga mat,
- Release your left knee toward your yoga mat. The left leg should stay flat on the floor. Glance back to make sure your left foot points straight back.
- Position your hips to the front of the yoga mat.
- Take a folded blanket or some other padded item and place it under the right side of your hip to make the pose more comfortable if needed.
- Once stable, bring your body down to a forward bend over the right leg.
- Keep your hips square and your weight balanced on both sides as much as you can. If this feels a little overwhelming, place a blanket or yoga block under your hip or back knee. Next, stretch your forehead toward the flooring.
- Continue to square your hips and breathe into any tightness.
- Raise back up while bringing your hands in line to your hips.
- To release the pose, curl your left toes underneath and step back into a Downward Dog.
- Repeat the Pigeon Pose on the opposite side.

Low Lunge (Anjaneyasana)
Low Lunge is a wonderful and freeing stretch for the hips and thighs. This pose can be done with both legs forward or back, depending on your preference. When doing Low Lunge, make sure you are always rotating from the hip instead of the knee.
Steps:
- Starting with the Downward Dog pose, breathe out and step your right foot forward and between your hands. You’ll align the right knee over the heel when you do this.
- Lower the left knee to the ground, sliding the left foot back until you feel a good stretch in the thigh and left hip.
- Keep your hips low & level to one another.
- Breathe out, and while engaging your lower belly, lift your chest away from your thigh while sweeping your arms up beside your ears.
- Look straight ahead, and then transition into a gentle backbend with your gaze going toward your thumbs. Breathe out and lower your hands back down. Return to Downward Dog.

The Takeaways
Take care of yourself, and don’t be afraid to push the limits. However, make sure you are prepared for your yoga session with stretches and warm-ups before you begin. Also, ask your doctor whether these stretches are safe for you, especially if you have an injury. Once you’ve been given the go-ahead, don’t hesitate to take some time each day to perform these stretches.

Supplement Your Yoga Workouts with TRUEENERGY® Performance Socks
TRUEENERGY® socks are powered by infrared technology, making them an excellent way to keep your feet warm before or after yoga! Additionally, the technology promotes better circulation, enhanced recovery, optimum performance and more energy after a workout.